Field Data Collection:
Global Positioning System (GPS)/Global Navigation Satellite System (GNSS)
|
Field Data Collection Storyline
|

|
 Figure 1: Constellation of Satellites from Wikipedia Commons
Introduction
In this technical skills lessons, the collection of data by the learner will be explored. This will be presented at an introductory level, since full courses on data collection and management are available. In this lesson data collection will be performed by using a smart device such as a cell phone or a tablet which has a true GPS (Global Positioning System) chip installed. Some of the skills discussed in this lesson will be; collecting x, y (z is optional) positions and successfully mapping them. Collecting data in a mobile application (app) is a process that must have clear methodologies to insure that the proper information is gathered while in the field, which will prevent returning to a collection site. The creation of domains in mapping software will be used in collecting data this is an important part of the process since, most mobile devises have relatively small keyboards for data entry. The mapping and analysis of data can be completed once the data has been collected and loaded into geospatial software. It is important to understand the resolution of the information being collected and the accuracy of the collection device.
In this lesson field data collection will utilize the Esri application (app) Collector. The components in this lesson will be created in a step by step procedure, since the topic is covered in more depth in web mapping courses. Most people are aware that their smart devices have what is known as a location service, but have little knowledge of their functionality. To collect data in the field the user must be able to locate their position on the surface of the earth, this could be done through the use of maps (paper or electronic) and calculate their location from known positions or landmarks, which would require a measuring device and a compass. In this lesson the position of the observer will be determined through the use of a GPS receiver which is built into the smart device. When reporting a position, the user should also determine the accuracy of the measured location. The location should always include a numeric accuracy, this term can be thought of as a circle with the center being the x, y position plus the radius of the accuracy. Thus the observer can assume they are in the circle. The third dimension (z) typically has greater error than the planar position.
Basic Information
A Global Positioning System (GPS) receiver works by receiving radio wave signals from multiple satellites and calculating a position from the information received. An important point is that a GPS unit is a receiving unit. It only gathers information and does not transmit back to the GPS satellites. Many GPS units have transmitters associated with them, but the transmitter part does not communicate directly with the GPS satellites. An example would be a cell phone, it is required by law to have true GPS installed, and if using an application such as Glympse[1] it will send the position of the user to another individual that has been selected. The position is determined with the GPS (chip and software), but the position is communicated via cell phone technology utilizing cell towers and received by the selected individual(s) (observer), if the user was in an area without cell phone coverage the observers would not receive any positional data. Another example, a trucking company wants to know the position of all their trucks on the road. Therefore, each truck would be equipped with a GPS receiver and some form of transmitter (satellite phone, cell phone, etc.) to send the GPS obtained position to the trucking company office and thus display the truck’s information about position, speed, etc. to the route manager. Not all tablets have true GPS chips in them. Those that do usually can be connected to a cellular service. Many tablets without GPS will attempt to determine position, but it is executed by other methods and the accuracy is fairly low. Some vendors create the same tablet with and without the GPS chip and charges different amounts for them.
How They Work
The United States has approximately 40 GPS satellites orbiting the earth every 12 hours. There are other GPS satellites owned by other countries, some receivers can use these satellites and the U.S. satellites together. The position of each satellite is known to a high degree of accuracy. Each satellite is equipped with an atomic clock[2] that keeps very accurate time. Each satellite is constantly sending out a time signal which is received by a GPS device. The signal from the GPS satellite is in radio wavelengths. The speed of the signal is the velocity of light (3 x 10⁸ m/s) a known quantity. The distance from the satellite to the receiver therefore can be measured. This distance is the radius of a sphere around the satellite. The position of the user on the sphere cannot be determined by a single satellite. When a second satellite signal is received the intersection of the two spheres will create a circle. A third satellite will resolve the location of two points of intersection. A fourth will resolve the position to a single point. When information is received from multiple satellites, a distance can be calculated to each satellite. Using mathematics, the point of intersection of these multiple spheres can be located, which is the position of the receiver[3]. The more satellites, the greater the accuracy; if four or more satellite signals are received, elevation can also be determined.[4] Position accuracy is usually between 3 and 10 meters, depending on the GPS receiving unit and if any ground-based stations are used. There are much higher accuracy GPS receivers, than the built in GPS receiver on your smart device.
Ground-based WAAS (Wide Area Augmentation System) stations, were developed by the Federal Aviation Administration (FAA). The use of WAAS stations provide additional precision in position location, improving the resolution to about a meter. There are 28 WAAS receiving stations in North America (Nov. 2016). These systems are only located in North America but not all areas of North America can receive the WAAS signals. Stations in South America may receive these signals but they cannot make use of the corrections in the southern hemisphere. The WAAS system corrects for errors in GPS satellite timing signals and then sends those correction to three geosynchronous[5] orbiting satellites. The GPS receiver must be enabled to receive this signal type which will increase the resolution.
In addition, some higher end receivers get more accuracy by taking multiple data point measurements and using a mathematical algorithm to compute the position of the receiver, the results can determine the position within a few centimeters. Some other methods for increased accuracy include placing a sending station at a known point on the earth near the location of the data collection. For example, this is used in precision agriculture, if a GPS receiver is used to measure the position of a combine, the ground station might be placed at a known location on the farm. This is important in agriculture to determine the productivity of different areas of a farm field, which then can be used to determine the amount of fertilizers that might be required to improve production in future years.
Data Collection
A GPS receiver is used to determine locations on the surface of the earth. This might be the location of a historical structure, a utility pole, or where a botanical sample was collected, just to name a few possible uses. The data can be collected manually (recording the information in a notebook) by recording the latitude and longitude (or a different coordinate system) of the location with the known error. These locations are known as waypoints. If the waypoints are stored electronically, then they can be transferred from the receiving unit to mapping software automatically or as a text file[6]. Many GPS receivers also come with mapping software. In addition, a GPS unit can determine the elevation of a location on the earth if enough satellite signals can be obtained. GPS interfaces can be configured to give continuous data, this provides a trail of where the GPS receiver has traveled, some devices will allow saving these trails. GPS software can also determine velocity by calculating the distance between two recorded points and the time between data points.
During the last several years, dedicated low end GPS receivers have been rapidly replaced with smart devices, such as smart phones. Initially one of the biggest differences was the requirement that the smart device had to maintain a cellular connection to download maps, but today there are numerous vendors that will allow downloading high resolution maps without a cellular connection. Consumer grade GPS units are rapidly disappearing and smart devices with true GPS chips are replacing them. Professional grade precision GPS units have a much higher degree of accuracy and a smart phone currently cannot replace them.
GPS Issues
If you are in an area with a large amount of leaf cover, it may be difficult to determine your position because your receiver may not obtain a good signal strength. This will create larger errors due to the water content in the leaves. GPS receivers are becoming more sensitive so they can provide more accurate locations even in heavily wooded areas. To map vegetation, such as trees, often times this is done in the winter when many trees are without leaves. Cloudy days can also impact the ability of the unit to receive a strong signal. Some vehicles which have metal oxides in the windshield will not receive the satellite signals effectively.
Standalone GPS Interfaces
GPS receivers can be self-contained units or require a smart phone, tablet, or computer to function. They can also be smart devices with a GPS chip installed. Most GPS receivers can be interfaced to a computer via Bluetooth (wireless), memory card slot, or USB connections. This interface may be only for downloading data or may be used in real time with the computerized device. Some GPS receivers have the ability to download new maps and others will use only the firmware map originally installed.
A permanent record of the location is important in many applications of GPS technology. Several camera manufacturers have developed internal GPS receivers for the use in digital cameras (DSLR), as well with cell phone cameras to store the location of the picture in the metadata. Every picture taken with a digital device records metadata about the camera and if enabled, the location of the picture.
Smart phone technology has a consumer grade GPS receiver. For this lesson it is suggested that the learner select an application (app) that will allow position viewing on the screen, as well as saving the waypoints to a file (or these can be recorded manually). As part of the Field Data Collection technical skills lesson the ESRI application Collector will be employed and can be downloaded on either an Android or Apple device at no charge. It will be used to connect to maps created in this lesson. The user will need to have an ArcGIS Online account to use Collector (contact your instructor).
Understanding Satellite Orbits
For information on understanding how a satellite orbits please click here.
Explore
Additional information about Global Positioning Systems may be found at:
http://www.gps.gov/systems/gps/ and http://www.faa.gov/about/office_org/headquarters_offices/ato/service_units/techops/navservices/gnss/gps
Sources
http://www.garmin.com/aboutGPS/
http://www.howstuffworks.com/gps.htm
Creating an Online Map
It is assumed that the learner is an experienced mapper and can create a map using a personal geodatabase. A new map will be created to collect information using a smart device. First, the purpose of the map layer to be created in the geodatabase and the subject matter for the data to be collected must be established. For example, when collecting data about trees, the user needs to determine the field attributes such as type of tree, height of tree, width, diameter or circumference of the trunk and always include a field for comments. When determining each of the attributes the designer will also need to decide the type of data such as is it numeric or text. Once the new file has been created and saved in the geodatabase the next step is domain creation.
Domain Creation
The term domain has different meanings in geospatial technology, for this example it will be a database file that can be referenced within another file so that information can be used numerous times to fill the database. The simplest way to think of this is when a computer program has a dialogue window and connected to it is a pull down arrow that allows the user to select an item, instead of entering a response manually. The information in that pull down window is the domain. Domains are used for redundant entries to make the data entry process quicker and to eliminate typographical errors that might occur especially in field data collection. When typing errors occur and the user attempts to query the data the entire dataset will not be visible. For example, if one user inputs the name of a tree with a capital letter and another does not the dataset will not query correctly. To improve results a more complicated query must be designed or the dataset would have to be manually corrected.
To create a domain the data file needs to reside in a geodatabase, this could be a new file without any data that was created previously. It is assumed that the learner can create a feature file in a geodatabase.
Process
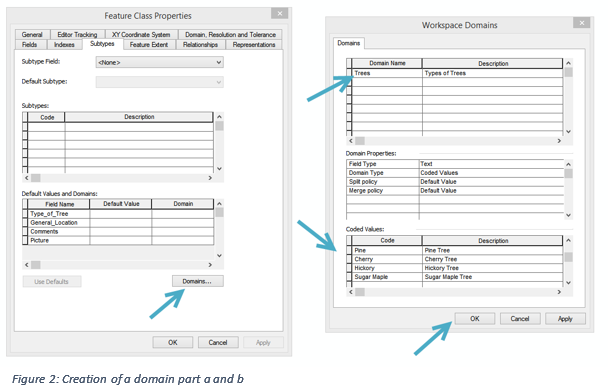
1. Use ArcCatalog to open the Feature Class properties and select Subtype tab, see Figure 2a (left image).
2. At the bottom of the Feature Class Properties, select the domain button which will open Figure 2b (right image).
3. The Domain Name field must contain a name with no spaces and no special characters. The description field can use spaces. In the middle set of boxes the Domain Type must be Coded Values. The Coded Values are inputted in the lower box, the Code again must follow the rules of no spaces and no special characters. Once the domain is created click OK. The user can come back to the domain and add additional coded items if required, for example, if a type of tree was not included in the list. Additional domains can also be added. Realize if additional items are added they may impact the already created data and may require manually editing the collected information. For example, in Figure 2 the domain is for trees. Several trees were initially entered, but additional tree types are needed after doing field data collection, they can be inputted from the window in Figure 2b. To utilize the domain information it must be coupled to the appropriate fields in the geodatabase. When the domain is used it populates the fields of the feature file. There is no permanent connection between the domain and the feature file.
Domain Creation
The term domain has different meanings in geospatial technology, for this example it will be a database file that can be referenced within another file so that information can be used numerous times to fill the database. The simplest way to think of this is when a computer program has a dialogue window and connected to it is a pull down arrow that allows the user to select an item, instead of entering a response manually. The information in that pull down window is the domain. Domains are used for redundant entries to make the data entry process quicker and to eliminate typographical errors that might occur especially in field data collection. When typing errors occur and the user attempts to query the data the entire dataset will not be visible. For example, if one user inputs the name of a tree with a capital letter and another does not the dataset will not query correctly. To improve results a more complicated query must be designed or the dataset would have to be manually corrected.
To create a domain the data file needs to reside in a geodatabase, this could be a new file without any data that was created previously. It is assumed that the learner can create a feature file in a geodatabase.
Process
1. Use ArcCatalog to open the Feature Class properties and select Subtype tab, see Figure 2a (left image).
2. At the bottom of the Feature Class Properties, select the domain button which will open Figure 2b (right image).
3. The Domain Name field must contain a name with no spaces and no special characters. The description field can use spaces. In the middle set of boxes the Domain Type must be Coded Values. The Coded Values are inputted in the lower box, the Code again must follow the rules of no spaces and no special characters. Once the domain is created click OK. The user can come back to the domain and add additional coded items if required, for example, if a type of tree was not included in the list. Additional domains can also be added. Realize if additional items are added they may impact the already created data and may require manually editing the collected information. For example, in Figure 2 the domain is for trees. Several trees were initially entered, but additional tree types are needed after doing field data collection, they can be inputted from the window in Figure 2b. To utilize the domain information it must be coupled to the appropriate fields in the geodatabase. When the domain is used it populates the fields of the feature file. There is no permanent connection between the domain and the feature file.
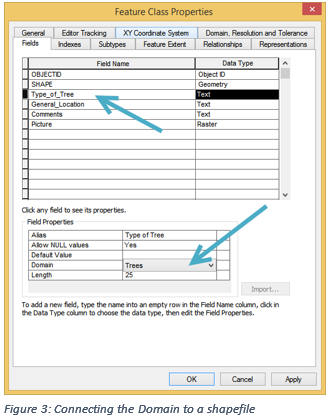
4. To utilize the created domain the user must connect the domain to a specific attribute. Open the Feature Class Properties and naviagate to the Fields tab. In the upper part, shown in Figure 3, the fields contained within the file located in the geodatabase are displayed. In this example there is a field labeled Type_of_Tree (note that no spaces are used), this field is a text field. When selected the lower part of the window will open. Note: In the lower part of the window the arrow is pointed toward the domain area and the author has already selected the domain previously created called trees, the pull down arrow is used to select the proper domain. In this example only one domain has been created, it would have been possible to create multiple domains. A domain can be used with multiple files in the same geodatabase, also the same domain can be used multiple times in the same file. For example, if you have a yes/no response in multiple fields, the one domain can be used for each of those areas. Also note; the designer can decide if a field can be left blank or not (see Allow NULL values).
ArcGIS Online
|
It is assumed that the user will have an account to ArcGIS Online (AGO), if not obtain one from your instructor.
Process
|
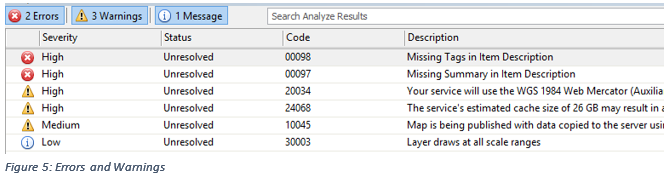
5. The next window will provide Errors, Warnings and Messages, see Figure 5. A map can be published with warnings but not with errors. To resolve the error click on it and most of the time a dialogue box will open. For this case no metadata had been added and thus the reason for errors. Once the metadata is added these errors will disappear. Some warnings are areas MUST be corrected for functionality or practicicality. ESRI charges users for corrections that are not made, if some of the warnings are not corrected it could be costly.
- Only a few map projections can be used in a web map, generally use the software suggestions to correct this warning.
- Cache size is critical and must be fixed prior to publication. To correct this warning click on it and uncheck Tile Mapping and check Feature Access. Note: at least one item must be checked, so Feature Access is checked before unchecking Tile Mapping. The Feature Access will allow for field data collection, if this is not checked edits cannot be made to the dataset. Map Tiling makes multiple resolution raster images to create quicker map loading but is also an expensive process to do with this online service.
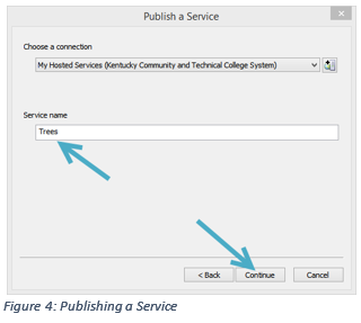
- Publish the map to ArcGIS Online.
6. The next step will be to login to http://arcgis.com in a web browser.
- Locate the file which was uploaded.
- Select the feature layer and using the pull down add the layer to a new map.
- Select a basemap.
- Select Save As to save the map.
- Select the editing levels under Edit.
- Enable and cofigure pop-ups.
- Share the file with the appropriate class group. If the file is shared with everyone, then anyone with an AGO account can add data to the data set.
- Save the map again.
8. Open your smart device and see if the file is visible and check that attachments can now be added in the Collector app. It may take a few minuets to be seen on the smart device.
9. Take the application which was constructed outside and populate with at least 10 data points
10. Load the data that was collected, which was saved in AGO, in ArcMap Desktop.
9. Take the application which was constructed outside and populate with at least 10 data points
10. Load the data that was collected, which was saved in AGO, in ArcMap Desktop.
- Insure that you are signed into AGO
- Under the data add button will be a selection to add your AGO data.
[1] http://glympse.com
[2] An Atomic Collect utilizes the vibration of Cesium 133 atoms. For more information: https://www.youtube.com/watch?v=p2BxAu6WZI8
[3] http://www.gps.gov/multimedia/videos/
[4] http://gis.stackexchange.com/questions/12866/why-does-gps-positioning-require-four-satellites
[5] A geosynchronous orbit is one in which the satellite stays always over the same location of the surface of the earth. Therefore, the satellite takes 24 hours to orbit the earth.
[6] This might be in CSV format. Which should be an unformatted file.
